
Splunk SmartStore is a remote storage tier used to store indexed and raw data. In our case, we are using Amazon's S3 object level storage. Amazon S3 offers highly resilient, highly secure, and highly available data storage in a cost effective way.
Splunk Reference Documentation: https://docs.splunk.com/Documentation/Splunk/latest/Indexer/AboutSmartStore
In this blog we will look at setting up Splunk's Smart Storage in a Lab Environment. We will use AWS IAM roles to read and write data to and from AWS S3 buckets as apposed to the access and secret key configuration provided in the indexes.conf as the majority of customers will be implemented key rotation policies that could cause issues further down the line. Our Splunk environment will consist of 1 x Search Head, 1 x Cluster Master and 2 x Clustered Indexers installed on EC2’s in AWS. We will use the Splunk Add-on for Unix and Linux TA to ingest OS level metrics from the Indexers operating system and store them in the AWS Smart Store.
Lab Environment:
Indexer Cluster (with default internal indexes):
Step 1: Create an S3 bucket
- Log into AWS and access the S3 storage page. Services -> Storage -> S3
- Click ‘Create Bucket’ and fill in the S3 bucket name and the region you want to use. (remember the S3 bucket name is global and needs to be unique).
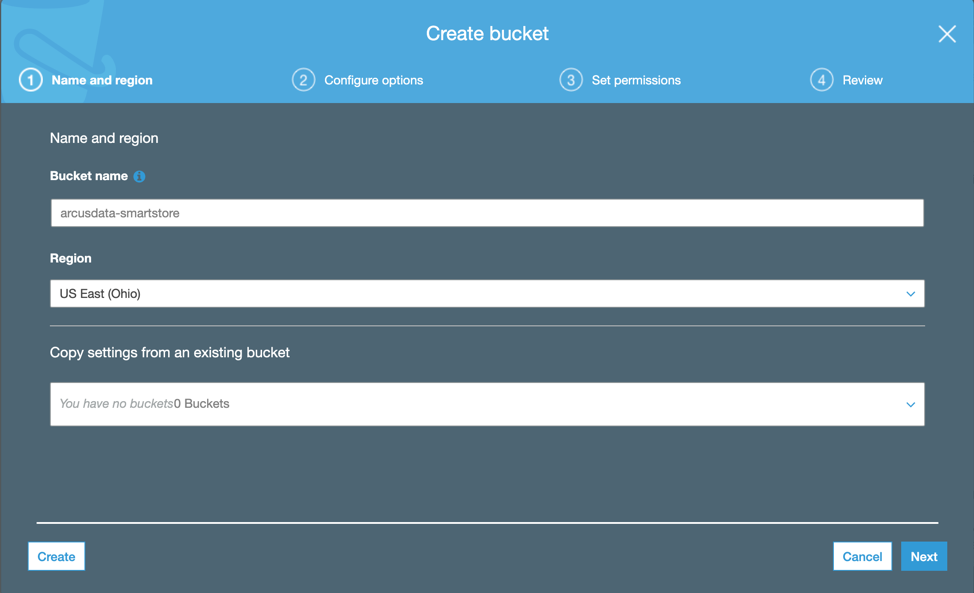
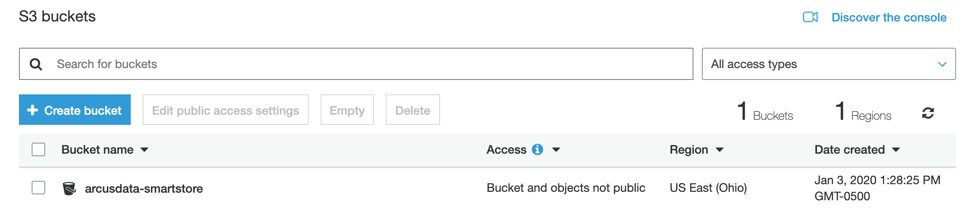
- Make sure the bucket is configured to BLOCK public access: https://docs.aws.amazon.com/AmazonS3/latest/dev/access-control-block-public-access.html
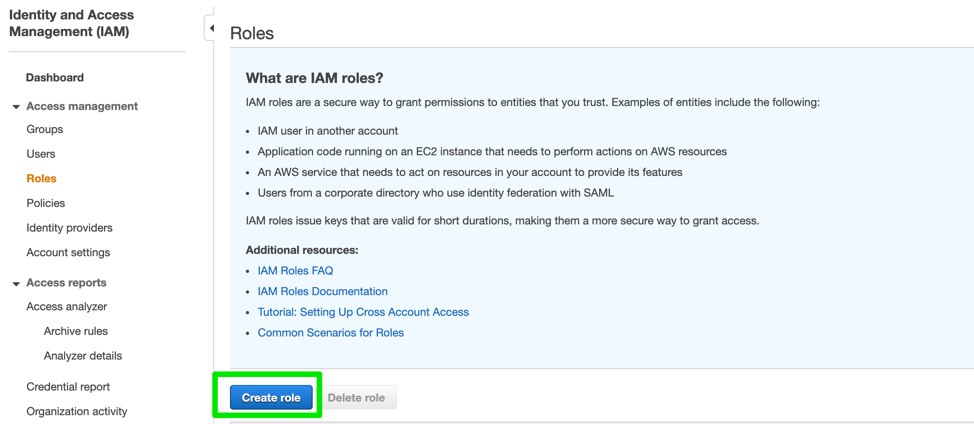
- Next, we want to set up our EC2’s access to the S3 bucket created. In other Smart Store documentation, they specify the use of API keys (Access key ID and Secret access keys) to permit access to S3. In our scenario, we will go with AWS’s best practice recommendation of using IAM roles.
- Navigate to IAM -> Roles -> ‘Create role’:
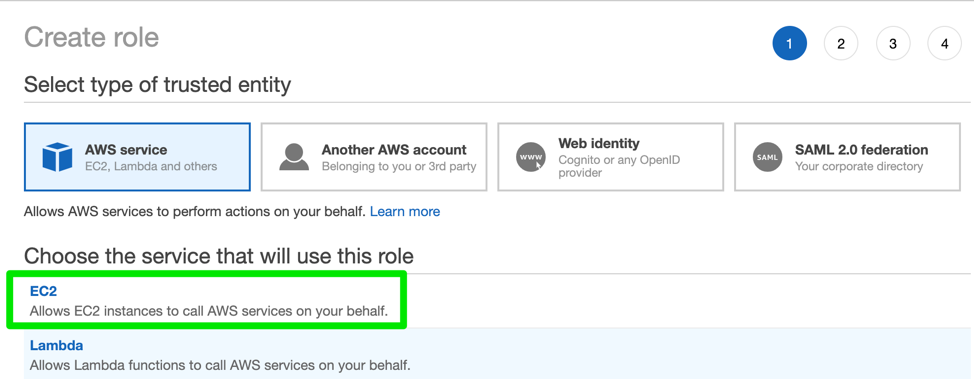
- Select EC2 service under the 'AWS Service' option:
- Enter the Role name and click next:
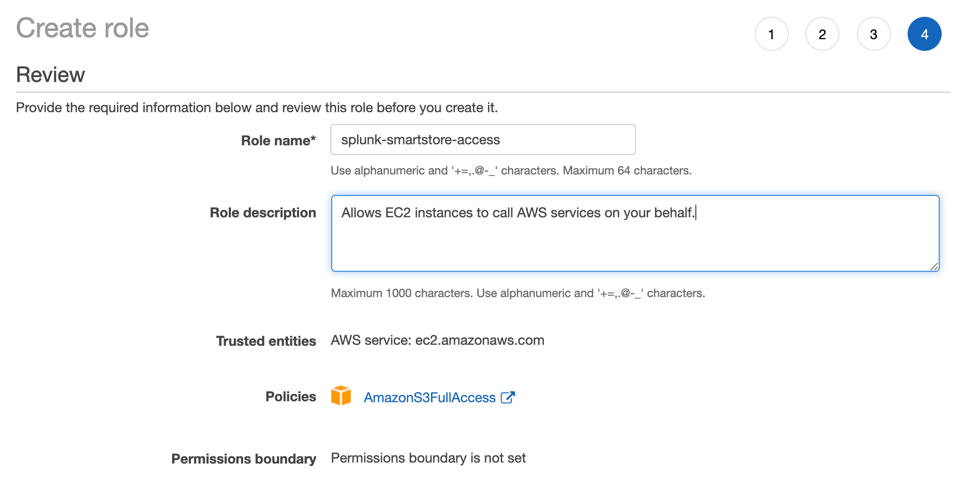
- In this instance, since it is a lab environment we have chosen ‘AmazonS3FullAccess'. In a Production environment however I would recommend going with a LEAST privilege model.
Lab Environment: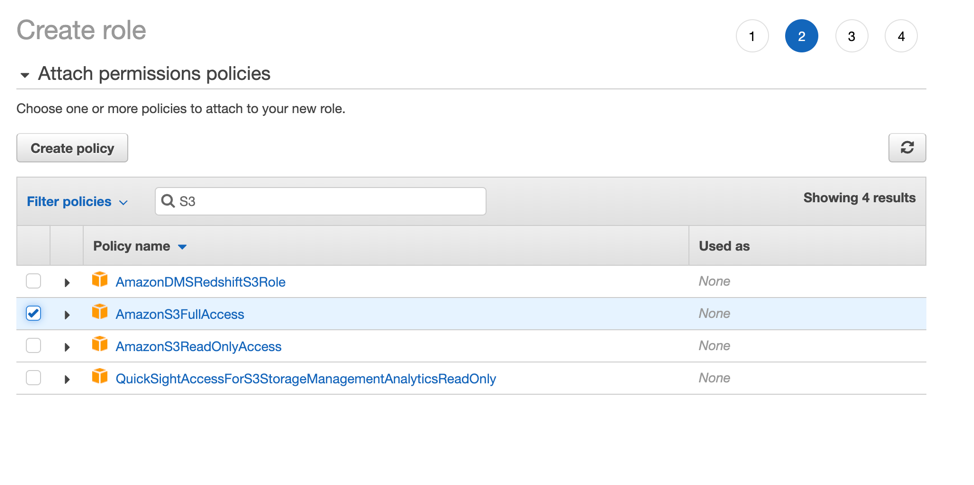
Production Policy Example:
{
"Version": "2012-10-17",
"Statement": [
{
"Sid": "SmartStoreFullAccess",
"Effect": "Allow",
"Action": [
"s3:GetLifecycleConfiguration",
"s3:DeleteObjectVersion",
"s3:ListBucketVersions",
"s3:GetBucketLogging",
"s3:RestoreObject",
"s3:ListBucket",
"s3:GetBucketVersioning",
"s3:PutObject",
"s3:GetObject",
"s3:PutLifecycleConfiguration",
"s3:GetBucketCORS",
"s3:DeleteObject",
"s3:GetBucketLocation",
"s3:GetObjectVersion"
],
"Resource": [
"my-smartstore-bucket/*",
"my-smartstore-bucket"
]
},
{
"Sid": "SmartStoreListBucket",
"Effect": "Allow",
"Action": [
"s3:ListBucket",
"s3:HeadBucket"
],
"Resource": "my-smartstore-bucket"
},
{
"Sid": "KMSEncryptDecrypt",
"Effect": "Allow",
"Action": [
"kms:Encrypt",
"kms:Decrypt",
"kms:GenerateDataKey",
"kms:ReEncrypt*",
"kms:DescribeKey"
],
"Resource": [
"my-kms-key-alias"
]
}
]
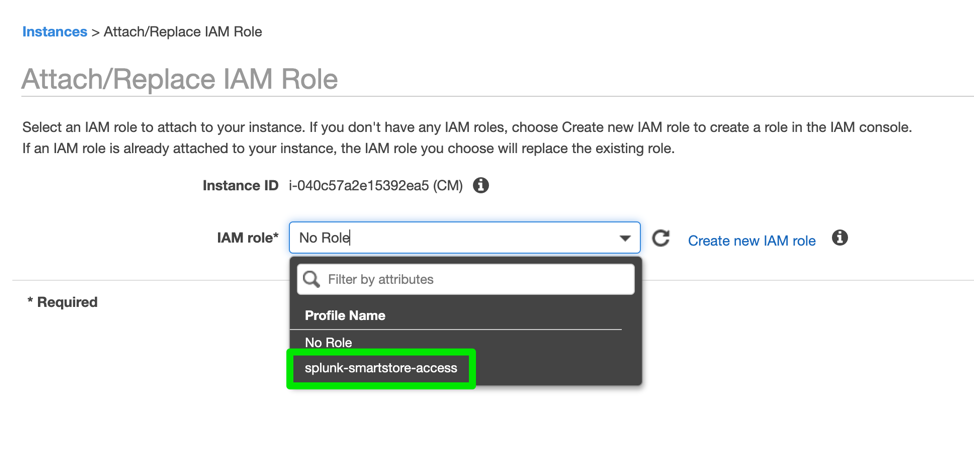
}- Assign the new role to your EC2 instances. In the EC2 page, select your EC2 instance, click on Actions -> Instance Settings -> Attach/Replace IAM Role

- Select the newly created role:
- Navigate to IAM -> Roles -> ‘Create role’:
Step 2: Configure Splunk to communicate with the S3 bucket.
In this step we are going to configure the indexes.conf configuration file on the Cluster Master and push it down to the Indexers. In our case, we will separate the configuration into 2 apps.
- arcusdata_indexer_volume
- arcusdata_all_indexes
In the arcusdata_indexer_volume app we specify the S3 specific settings.
In the arcusdata_all_indexes app we will specify our indexes. (os index in this case).
Set up the S3 bucket configuration In the indexes.conf of the arcusdata_indexer_volume app:
[default]
# Configure all indexes to use the SmartStore remote volume called
# "remote_store".
# Note: If you want only some of your indexes to use SmartStore,
# place this setting under the individual stanzas for each of the
# SmartStore indexes, rather than here.
remotePath = volume:remote_store/$_index_name
repFactor = auto
[_introspection]
repFactor = 0
[_metrics]
repFactor = 0
# Configure the remote volume
[volume:remote_store]
storageType = remote
# On the next line, the volume's path setting points to the remote storage location
# where indexes reside. Each SmartStore index resides directly below the location
# specified by the path setting. The <scheme> identifies a supported remote
# storage system type, such as S3. The <remote-location-specifier> is a
# string specific to the remote storage system that specifies the location
# of the indexes inside the remote system.
# This is an S3 example: "path = s3://mybucket/some/path".
path = s3://arcusdata-smartstore
# The following S3 settings are required only if you're using the access and secret
# keys. They are not needed if you are using AWS IAM roles.
remote.s3.endpoint = https://s3.us-east-2.amazonaws.com
#remote.s3.access_key = <access key ID>
#remote.s3.secret_key = <secret access key>
Configure the new 'os' index In the indexes.conf of the arcusdata_all_indexes app:
[os]
homePath = $SPLUNK_DB/$_index_name/db
# SmartStore-enabled indexes do not use thawedPath or coldPath, but you must still specify them here.
coldPath = $SPLUNK_DB/$_index_name/colddb
thawedPath = $SPLUNK_DB/$_index/thaweddb
remotePath = volume:remote_store/$_index_name
[_internal]
remotePath = volume:remote_store/$_index_name
Step 3: ONBOARD DAta and test s3 bucket creation.
The Index directory will only be created in S3 once Splunk receives data. Initially, before you onboard any data and assuming you have everything set up correctly, you should see the internal index directories created in S3.
In our test environment we enabled some OS level inputs on our Indexers and directed the results to the newly created ‘os’ index.
e.g
[script://./bin/top.sh]
index=os
interval = 60
sourcetype = top
source = top
disabled = 0
Once data is collected and sent to the Indexers you should see the index directory structure created in S3: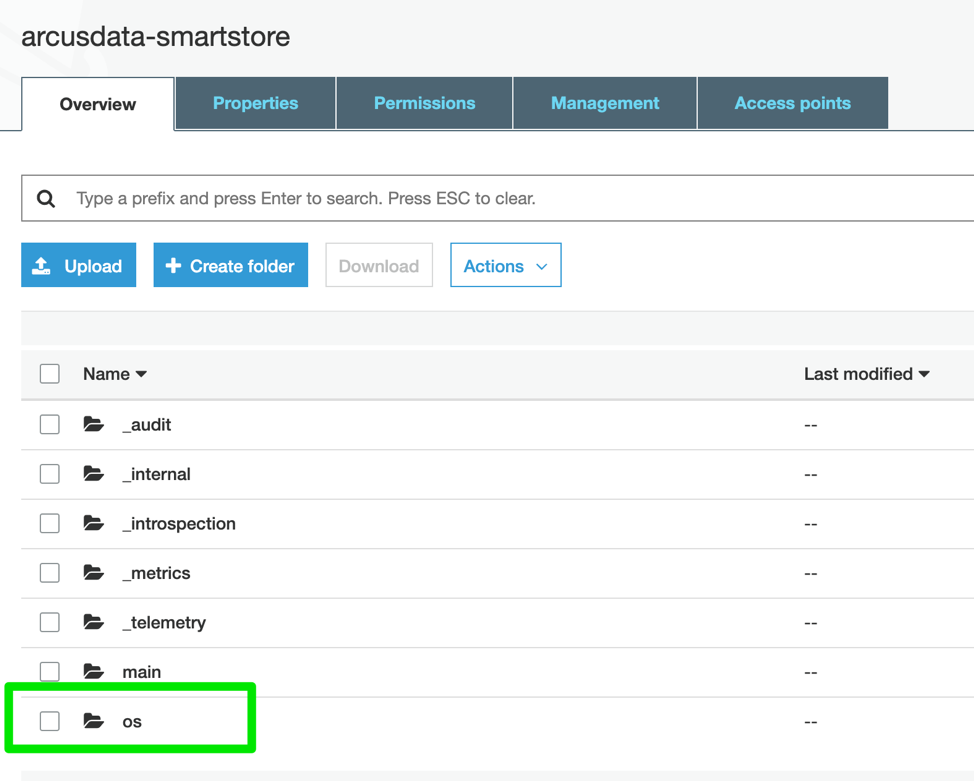
Here we can see the Index directory structure created on S3:
So there you have it, a quick and easy way to ingest and store Splunk data in Amazon's S3. Any questions, comments or feedback please don't hesitate to reach out to imurphy@arcusdata.io.
Want more insight like this? Make sure to follow us on LinkedIn, Twitter and Facebook!