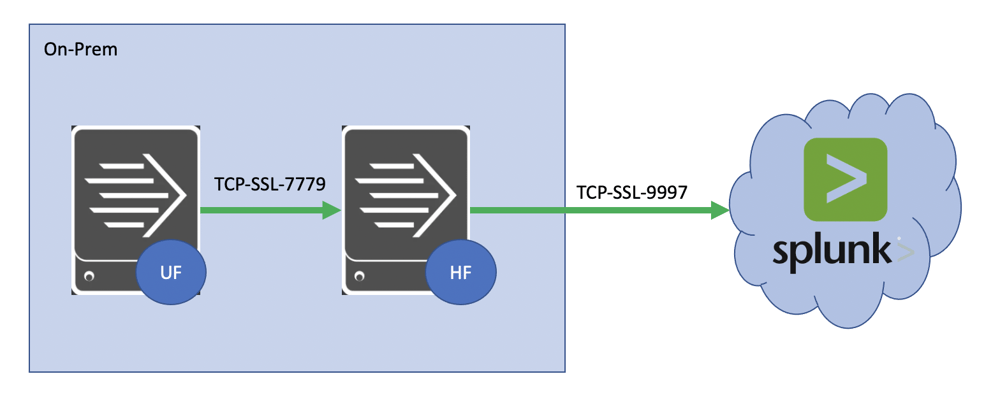
There maybe certain use-cases where you require end-to-end encryption of data as it traverses from source to destination, in our case from our Splunk Universal Forwarder to Splunk Cloud via an on-prem Splunk Heavy Forwarder.
In most cases, log data and other metrics are unencrypted while on-prem and only encrypted as they exits your environment and travel across the internet (on port 9997 or 443) to Splunk Cloud. Splunk provides a cert for communicating with Splunk Cloud and it is well documented on how to set up this integration. In the below example however, we will outline the steps required if you need to also encrypt data between the Universal Forwarder and the intermediate Heavy Forwarder.
It can become tricky as the Heavy Forward receives encrypted traffic, needs to decrypt it using one set of certs, then re-encrypt it and send to Splunk Cloud using the Splunk provided certs.
Hopefully the below steps can help you if you need to perform similar tasks.
Steps to Enable SSL in Splunk
The process to set this up is pretty straight forward but there are a few key configurations that are vital in order to get it working as expected. Below we will step through this process.
First we will set up the Heavy Forwarder to Splunk Cloud communication.
- Log into Splunk Cloud and click on the Universal Forwarder app on the left had side menu.

- Click on the 'Download Universal Forwarder Credentials' button. (These configs will also work for the Heavy Forwarder.
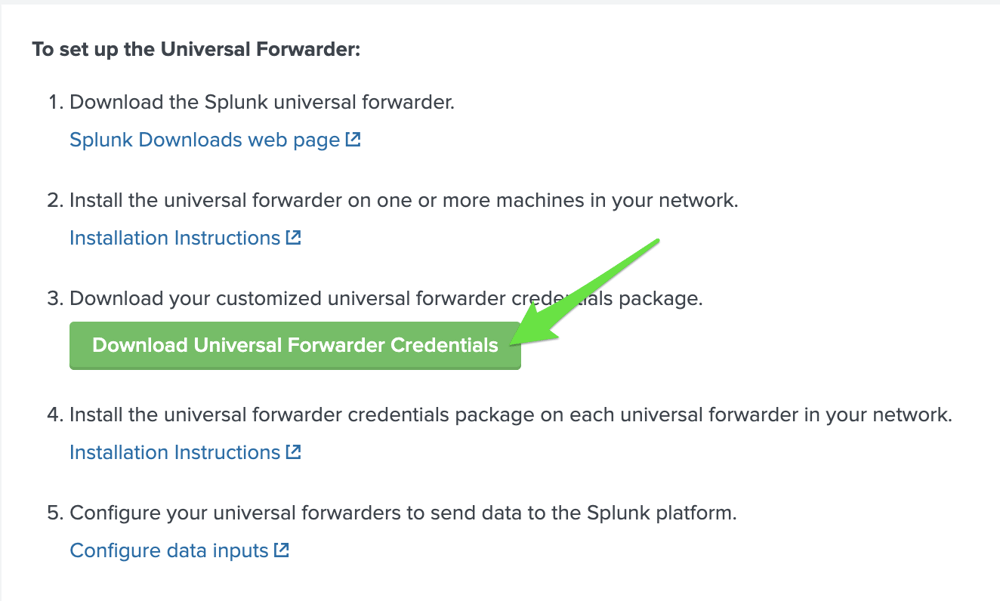
- The download will be a .spl file. This is the same as a .tar file. Untar the file (tar -xvf splunkclouduf.spl) and put the resulting app (100_<vendor>_splunkcloud)into $SPLUNK_HOME/etc/apps. You will need to restart the Heavy Forwarder (HF) to get it working. This will encrypt the password in the app. (Remember, if you need this app on multiple HF's then make sure the password is the unencrypted raw password, as the encrypted password is tied to the HF instance.
- You can test if your HF is communicating with Splunk Cloud by running a search for your HF internal logs from the Splunk Cloud Search Head. i.e. index=_internal host=heavy-forwarder
Next we need to get the Heavy Forwarder set up to receive encrypted traffic from the Universal Forwarder.
Create a new directory for your certificates
export SPLUNK_HOME=/opt/splunk
mkdir $SPLUNK_HOME/etc/auth/certs
cd $SPLUNK_HOME/etc/auth/certs
Generate a private key for your root certificate
$SPLUNK_HOME/bin/splunk cmd openssl genrsa -aes256 -out myCAPrivateKey.key 2048
Generate and sign the certificate
$SPLUNK_HOME/bin/splunk cmd openssl req -new -key myCAPrivateKey.key -out myCACertificate.csr
$SPLUNK_HOME/bin/splunk cmd openssl x509 -req -in myCACertificate.csr -sha512 -signkey myCAPrivateKey.key -CAcreateserial -out myCACertificate.pem -days 2048
Create the server certificate:
Generate a key for your server certificate
$SPLUNK_HOME/bin/splunk cmd openssl genrsa -aes256 -out myServerPrivateKey.key 2048
Generate and sign a new server certificate
$SPLUNK_HOME/bin/splunk cmd openssl req -new -key myServerPrivateKey.key -out myServerCertificate.csr
$SPLUNK_HOME/bin/splunk cmd openssl x509 -req -in myServerCertificate.csr -SHA256 -CA myCACertificate.pem -CAkey myCAPrivateKey.key -CAcreateserial -out myServerCertificate.pem -days 2048
Create a certificate chain for your CA Certificate & Server Side Certificate
cat myCACertificate.pem >> combinedCACertificate.pem
cat $SPLUNK_HOME/etc/apps/100_<vendor>_splunkcloud/default/<vendor>_cacert.pem >> combinedCACertificate.pem
cat myServerCertificate.pem >> myHFCertificate.pem
cat myServerPrivateKey.key >> myHFCertificate.pem
cat myServerCertificate.pem myServerPrivateKey.key myCACertificate.pem > ufServerCertificate.pem
Update the inputs.conf of the Heavy Forwarder (in my case I use the inputs in $SPLUNK_HOME/etc/system/local. I chose a custom port of 7779 and reserved port 9997 in case I needed unencrypted data to flow through the same Heavy Forwarder in the future.)
[default]
host = heavy-forwarder
[splunktcp-ssl://7779]
disabled = 0
serverCert = /opt/splunk/etc/auth/certs/myHFCertificate.pem
sslPassword = <password used during cert creation>
requireClientCert = true
sslVersions = "*, -ssl2"
compressed = true
Finally we need to set up the Universal Forwarder (UF) to send encrypted data to the Heavy Forwarder (HF).
Update the outputs.conf of the Universal Forwarder
[tcpout]
defaultGroup = target_group
[tcpout:target_group]
server = heavy-forwarder:9997
clientCert = $SPLUNK_HOME/etc/certs/ufCertificate.pem
useClientSSLCompression = true
sslPassword = Tf/KqH0tpqLiYpgWTw9tU+Tf/KqH0tpqIv
Update the server.conf of the Universal Forwarder
[general]
serverName = tnx-truffle-drew-02
pass4SymmKey = $7$kmhj+ZgMPmUclwAl7uhDmi4fjDejT8qHw59WUct0uh8J4DRzt0kwnA==
[lmpool:auto_generated_pool_forwarder]
description = auto_generated_pool_forwarder
quota = MAX
slaves = *
stack_id = forwarder
[lmpool:auto_generated_pool_free]
description = auto_generated_pool_free
quota = MAX
slaves = *
stack_id = free
[sslConfig]
sslPassword = cLgUXI3Tz1biuLWHbeY2cLgUXI3Tz1eOA
sslRootCAPath = $SPLUNK_HOME/etc/certs/combinedCACertificate.pem